
When setting up a Deye inverter data logger for the first time, some users notice that the inverter seems to be working normally, but no solar production data appears in the Deye Cloud app. In most cases, this simply means the data logger hasn’t been connected to the home WiFi network yet. Once the logger is connected through its local setup page, it will automatically start uploading data to the cloud and remote monitoring will work normally. This guide walks you through how to connect your Deye data logger to WiFi.
Deye Data Logger WiFi Setup Steps
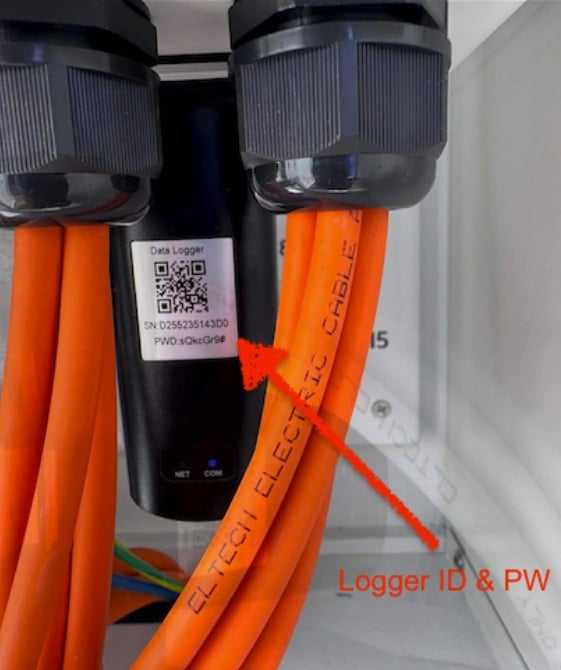
1. Find the label on the bottom or side of the inverter, then write down the Logger ID and the WiFi password for the data logger.
2. Turn off mobile data on your phone, then manually “Forget” your home WiFi network in your WiFi settings. This helps prevent your phone from automatically switching networks during setup, which can interrupt the connection process.

3. Open the WiFi list on your phone and connect to the hotspot broadcast by the data logger. Enter the password shown on the device label when prompted. The hotspot name usually looks something like AP_XXXXXXXXXX, with the last part being the serial number.
Note: After connecting, your phone may show a “No Internet Connection” message. This is completely normal because you’re connected to the logger’s local setup hotspot, not your home WiFi network.

4. Open a browser on your phone, type 10.10.100.254 into the address bar, and open the page. If this is your first time accessing the setup page, you’ll be asked to create a login username and password (the password must be at least 6 characters long). After creating the account, tap “Done” and log in again.

5. Enter your username and password in the login window to access the logger settings page.

6. After logging in, you’ll see basic information such as device status, network status, and logger details.

7. In the menu on the left, click “Wizard”, then click “Refresh” to scan for nearby WiFi networks.

8. Select your 2.4GHz network from the list (do not select a 5GHz network). If multiple networks appear, choose the one with the strongest signal (highest RSSI), then click “Next”.

9. Enter your home WiFi password, then click “Next”.

10. If any extra security settings pop up, don’t worry about changing them. Just leave everything on the default settings and click “Next”.

11. Your Deye data logger WiFi setup is now complete. Click the “OK” button on the page. The WiFi module will save the settings, restart automatically, and connect to the home WiFi network you selected.

12. After rebooting, return to 10.10.100.254 admin page and log in again. Then open the device information page and check the Wireless STA Mode status.
If Wireless STA Mode shows “Enabled,” the data logger has successfully connected to your home WiFi network. If it still isn’t connected, go back through the earlier steps and set up the WiFi connection again.

13. Once the network setup is complete, and after you’ve registered a Deye Cloud account and linked your device in the app, you’ll be able to remotely monitor real-time solar production data and inverter status directly from the Deye Cloud app.


