
Connecting your data logger to Wi-Fi is the key to unlocking remote monitoring for your Deye inverter. While you can handle this via the 10.10.100.254 local page, most users can also complete the setup directly through the Deye Cloud app.
For first-time users, the Deye Cloud app is usually the easier option. This guide walks you through the full setup process step by step, from creating a plant and adding the logger to connecting the logger to your home WiFi network.
How to Set Up a Data Logger in the Deye Cloud App
1. Open the WiFi settings on your phone and connect to the home 2.4GHz WiFi network that you want the Deye data logger to use.
Important: Most Deye inverter WiFi data loggers only support 2.4GHz WiFi. Do not select a 5GHz network, or the WiFi setup may fail.

2. Download and install the latest version of the Deye Cloud app from the App Store or Google Play, then open the app on your phone.

3. Sign in to the Deye Cloud app. If this is your first time using the app, tap “Register” to create a new account. Follow the on-screen instructions to enter your email address or phone number, verification code, password, country, and region, then complete the registration process and sign in.

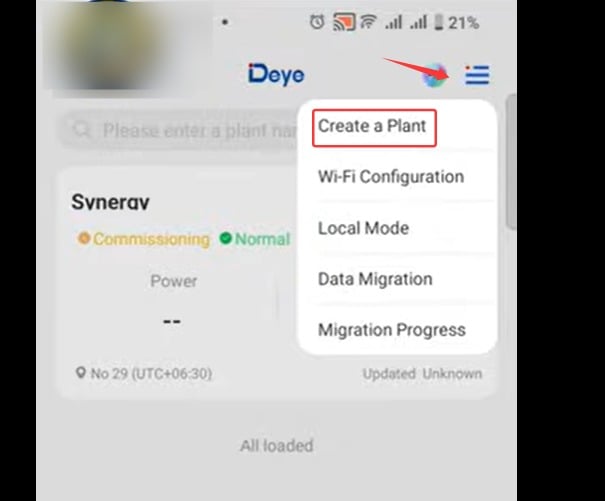
4. Once you're on the home screen of the Deye Cloud app, tap the menu icon in the top-right corner and select “Create a Plant”.
5. Enter your plant information, such as the plant name, country, and time zone, then save the settings. For example, you can use a simple plant name like “IPSHU Home”.

6. Once the plant has been created, the app will prompt you to add a data logger. You can either scan the QR code on the Deye inverter data logger or manually enter the SN (serial number).

7. Tap “Confirm” to continue to the network setup page. The app will automatically detect the network currently connected to your phone. Enter your WiFi password, then tap “Start Configuration”.
If the wrong network appears, tap “Switch Network” and select the correct home 2.4GHz WiFi network before continuing.

8. When prompted to join the network or connect to "AP_XXXXXXXX", tap “Join” or “Connect”. If the prompt doesn't pop up, jump into your phone’s Wi-Fi settings, find the "AP_" hotspot, and connect manually.

9. After connecting to the logger hotspot, immediately switch back to the Deye Cloud app. The app will begin configuring the logger network automatically.

10. When the page displays “Configuration succeed”, tap “Done”. You will then return to the device list page. Wait about 5–10 minutes for the data to sync. Once the app syncs, your inverter's real-time performance data will go live on your Deye Cloud application dashboard.


